Safety of Research Chemistry Laboratory Chapter 4
Date: 2022-01-19 Source: RUANQI Classification: Resources
#This series is translated from the safety guidance book on research chemistry laboratory printed by the chemical safety committee of the Joint Council of American Chemical Societies. It is the best practical guide for freshmen and sophomores#
Chapter IV laboratory technical suggestions
Introduction
Chapter 3 describes some types of physical, health and environmental chemical hazards and the effects of exposure to chemicals. This chapter is about how to safely implement common laboratory technologies and safely deal with the most commonly used equipment in undergraduate chemistry laboratories. The tips and recommendations in this manual focus on the most common topics encountered in freshman and sophomore courses. Mention some advanced topics that you may encounter in the advanced courses in the extension column, but a comprehensive introduction to advanced technology is beyond the scope of this publication. References in the appendix point to other sources of safety information.

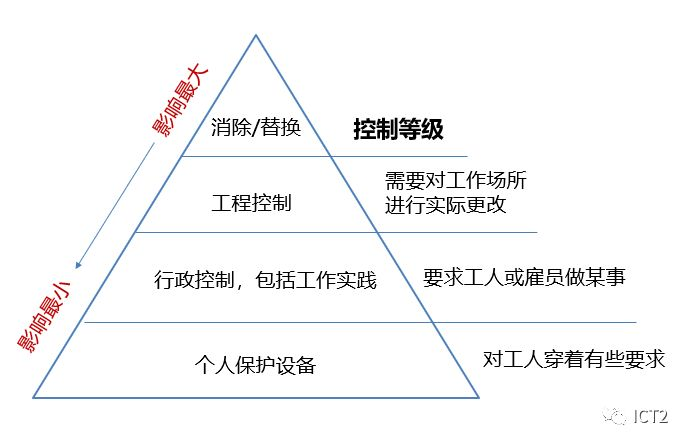
As described in Chapter 1, the ramp system is a useful example when you work in the laboratory. Chemical safety must be everyone's top priority. Apply ramp concepts in preparation for each lab meeting. Once hazards are identified and evaluated, they must be minimized and managed. Minimize hazards to reduce risks, including adding controls or barriers between workers and hazards. Control measures are only steps taken to eliminate or minimize hazards. (please note that less hazardous or less hazardous substances used in the laboratory can also have a positive impact on the environment. See "green chemistry - not just a slogan".) The order or hierarchy of controls is used to prioritize control. Steps that should be considered (see "control level").
As an undergraduate, before entering the laboratory, you must carefully listen to all directions and complete all laboratory preparations. Carefully check the details of the upcoming laboratory procedures. If you have any doubts about the hazards of the laboratory, please consult your teacher before starting the experiment. Your teacher or undergraduate research mentor may want you to view the advanced technology of a specific experiment and may provide you with specific instructions to ensure your safety.
■ Control level
Removal: preliminary design of facilities, equipment, chemicals or processes to eliminate hazards.
Substitutes: use less hazardous substances or processes; Select another solvent that allows lower reaction temperature or pressure, reactant with lower toxicity, etc.
Engineering: laboratory hood, glove box, biosafety cabinet, vent pipe, safety interlock, lead shielding, inert gas, etc.
Administration: implementation of procedures and policies (standard operating procedures), training, reduction of contact time, attention to nearby employees or other students, signs, best work practices, not working alone, etc.
Personal protective equipment: gloves, respirators, aprons, laboratory clothes, goggles, earplugs, masks, etc
Working With Chemicals, Apparatus,
and Equipment
Following these suggestions will help simplify your work and make laboratory equipment safer, so as to improve the possibility of successful experiment. As described in Chapter 3, the chemicals in the laboratory may have many hazards, but the equipment used in the experiment also has hazards. Pay special attention to procedures for increasing or decreasing temperature and pressure. Electrical equipment is required, open fire is used, or you are not familiar with the equipment used. Do not disable safety features or guards on the equipment.
General problems when working in the laboratory
As you read the Lab guide, review any new terminology and check the reference sources suggested by the lab instructor. If you or other students encounter accidents (sudden rise or fall in temperature, excessive gas release, etc.), please make sure you know what to do. Or, for example, if the experimental instructions indicate that the temperature should not exceed the predetermined point and you do not understand the reason, you should discuss it with your teacher.
Accidental exposure to chemicals
Chemicals can be transferred to you indirectly (and accidentally) in various ways. Some common examples are:
• chemicals on your hands or gloved hands can be easily transferred to the pen or pencil in the laboratory. If you are used to putting the pen or pencil into your mouth, you can transfer it to your mouth. Avoid this habit.
• if you temporarily lift your goggles and rub your eyes, the chemicals in your hands will transfer to your eyes. Chemicals in hands can easily be transferred to mobile phones or computers. In addition, if mobile phones are used in the laboratory, they may transfer chemicals to your face.
• if you wear gloves in the laboratory and they are contaminated, they will spread the contamination to all objects you touch in the laboratory: computers, scales, hot plate controls, glassware and mobile phones. This is easy to diffuse pollution. You should take off your gloves when you leave the laboratory, otherwise you may pollute the door handles and other items outside the laboratory.
Gloves are designed to act as an additional barrier to avoid skin contact. Ideally, they should not be contaminated, but if you doubt this, replace them immediately to avoid the conditions listed above.
■ Green Chemistry - not just a slogan
Green chemistry was born in the environmental revolution in the mid-20th century. It was during this period that the public began to understand what many scientists already know: many chemicals and their by-products are used to create industrial miracles of modern life, which may have destructive side effects on the environment and human health if not managed properly. Green chemistry is consistent with the principles of pollution prevention and control and involves the practice of redesigning processes to minimize the use and formation of known hazardous chemicals. A chemical is considered less hazardous if it is less toxic to humans and the environment, is not flammable, and will not bioaccumulate in the environment. Although you may not have been actively involved in green chemistry, it is likely that this concept has been applied to your experiments in introductory and organic chemistry laboratories. These adjustments minimize the generation of hazardous waste, provide safer laboratory working conditions, consume less energy and water, and reduce or reuse chemicals.
To learn more about green chemistry, read ACS Institute of green chemistry 1
Scientific glassware
The instructions provided by the instructor shall indicate the appropriate size of glassware to suit the operation to be performed. If there is no exact size (e.g. 250ml), remember that you should choose glassware so that at least 20% of the free volume remains in the container throughout the experiment. For chemical reactions, borosilicate glassware (e.g., heat-resistant glass or Kimax) is used because it can withstand extreme changes in temperature and minimal impact without fracture.
Clean glassware before use (see Chapter 2). If you share equipment with other students, please pay special attention to the condition of your glassware in each period. Before using, you should carefully check your glassware for cracks, stars and fragments. During heating, small defects in the glass will lead to failure. Whenever defective or damaged glassware is found, please consult your teacher, because in some cases, special glassware can be repaired rather than discarded. Damaged glassware shall be discarded in a suitable waste container marked "broken glass only". Your teacher will introduce the steps of changing glassware. Keep the workspace free from clutter. Currently used glassware can only be placed on the table.
Use flammable liquids or gases
Usually, many students share limited laboratory space, so please pay attention to other students, their experimental settings and their actions around the laboratory. Be sure to pay attention to the proximity of the reagent bottle to open fire or other fire sources or heat sources, and ask the teacher whether the reaction device should be relocated. If storage at room temperature is recommended, flammable solvents should be stored in flammable cabinets. Always minimize the amount of solvent outside the flammable cabinet.
Laboratory fume hood
The laboratory fume hood is an engineering control and is recommended for all operations that may produce uncomfortable odors or toxic or flammable gases. The space in the fume hood may be limited, and the laboratory fume hood used for the experiment cannot be used to store chemicals or waste. The fume hood may have small glass panels sliding on the side, or larger panels raised and lowered, or both. This part of the fume hood is called window sash. Once the setup part of the experiment is completed, the window sash should be reduced or closed as much as possible to maximize the airflow through the workspace and away from the user. The airflow in the laboratory fume hood may be interrupted by the airflow on the window or door, or even by changes in the position of students standing in front of the fume hood. Keep the sash down as much as possible and open only the minimum amount required to access the device.

Before installing devices in the fume hood, ensure that the fume hood is working properly. Properly operated fume hoods require adequate airflow and no excessive turbulence to maximize the accommodation of chemicals and eliminate personal exposure. If you are not sure whether the fume hood is working properly, please ask your mentor. During the experiment, always keep your face out of the plane of the fume hood window frame. When placing the equipment in the fume hood, place it at least 15 cm (6 inches) from the front edge of the fume hood. Work in the fume hood as far as possible, but do not block any rear exhaust. Whenever possible, the equipment should be raised in the laboratory fume hood to minimize interruption of air flow.
■ Extension: explosion prevention
When the window sash is closed, the fume hood shall protect the user from the influence of toxic gas, but in case of chemical explosion, the fume hood can not fully protect you from personal injury. When it is necessary to perform procedures that may lead to catastrophic failure (implosion or explosion), the experiment must be carried out behind the laboratory fume hood designed for this purpose. The shield should be stable so that it will not be knocked down or become a projectile in the event of a catastrophic failure. In addition to wearing goggles, comprehensive protection should be used when checking for possible explosive reactions.
Distillation
The common separation and purification method is distillation. Distillation systems need to be carefully designed and set up to safely achieve effective selective evaporation and subsequent condensation of the desired products. Distillation uses differences in the volatility of the components of the mixture to separate the mixture. Potential hazards include increased pressure, flammable heating solvents, causing exothermic reactions, and steam leaks that can ignite and continue heating until dry. Please carefully follow the specific instructions provided by the laboratory instructor and ask questions if necessary to clarify the procedure.
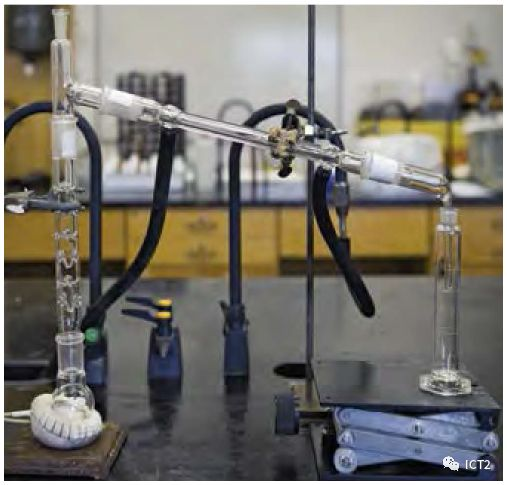
To heat and calm the boiling to avoid impact. Shock refers to the overheating of the solvent, and then the sudden release of large steam bubbles, forcing the liquid to flow upward out of the boiling flask. Your teacher may advise you to add zeolite to the round bottom flask to minimize impact. Zeolites provide nucleation sites for bubbles and prevent overheating. Even heating under stable stirring can minimize this concern. Your lab instructor may instruct you to use a hot plate with a stirrer or heating jacket. Be sure to pay attention to the reaction temperature and do not heat it above the temperature indicated by the program.
■ Extension: unattended equipment operation
Advanced chemistry laboratories usually involve more hazardous chemicals and reactions. Unattended reactions at night or other times are the main source of fires, leaks and explosions. Do not let the power mixer, heating plate, heating hood, condenser and other equipment stay overnight without safety protection devices, unless your instructor fully understands the process and your teacher agrees. Regularly check unattended reactions. Please be sure to leave a note with a clear telephone number so that you and the teacher can be contacted in case of emergency. Remember that in the middle of the night, emergency workers rely entirely on accurate instructions and information.
Extraction
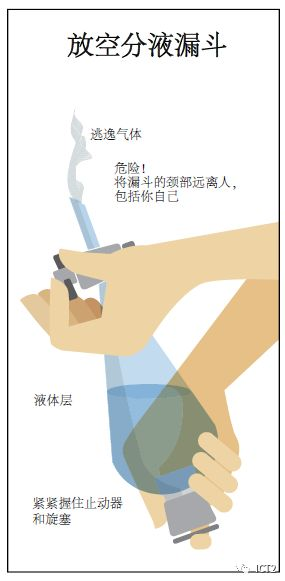
Glass separators are usually used to separate mixtures. Watch your teacher demonstrate proper use and always follow the instructions provided by the separation program. Generally, do not put the separating funnel near the flame or other fire sources. Be sure to guide the steam away from yourself and others from the laboratory, and introduce the steam into the laboratory fume hood. When using volatile solvents, first rotate the unopened separating funnel to evaporate some solvents and exhaust the air. Then close the funnel, hold the plug in place, and immediately open the cock to release air and steam. Hold the piston firmly in place with your hands and fingers. Repeat as needed.
Precautions for using electrical equipment
Check the insulation on the wire before use. The outlet plug should not be bent or damaged. Do not pull the power cord when unplugging from the power socket. Firmly grasp the end of the plug and pull the plug directly out of the socket. Do not remove the plug with wet hands. Damaged, broken or broken wires and signs of electrical failure or overheating should be reported to your teacher immediately. For normal power (110-115 VAC) applications, only Trident grounded, double insulated or isolated wiring can be used. Due to the risk of fatal electric shock or electric burn, care must be taken when exposed to live circuits. Currents as low as 0.1 amp can cause fatal electric shocks.
The first and most commonly used electrical equipment in the laboratory are hot plates and hot plates with magnetic stirring motors. When using a hot plate with a magnetic stirrer, remember that the outside of the ceramic plate will not get cold, whether it is cold or hot. Always carefully grasp the moving plate at the bottom of the equipment. If you grasp the top ceramic plate when it is hot, you may scald yourself. Before opening the hot plate, make sure that the power cord does not contact the ceramic top of the hot plate. Most hot plates are not explosion-proof. When you heat organic solvents, they should be used in the fume hood to remove steam.
Note that the control of magnetic stirrer and temperature control usually look similar. Be sure to carefully distinguish between the knobs you are increasing or decreasing. Some models allow the user to continue to rotate the dial from low to off and then to high. Before leaving the laboratory, make sure that the hot plate is closed and the plug is unplugged.
Refrigerator
Refrigerators and freezers are used in the laboratory when low-temperature storage of laboratory chemicals is required. The label on the chemical will indicate the storage temperature of the chemical. Depending on the type of laboratory, these devices may be rated as storing flammable materials. Units rated for the storage of flammable materials ("laboratory safety") protect the contents of the interior and are clearly marked on the front.
Under no circumstances should flammable substances be stored in non flammable or household refrigerators. Chemicals stored in refrigerators should be placed on spill trays with sufficiently high edges to accommodate all contents in the event of spillage. Under no circumstances should food or beverages be stored in the refrigerator of the chemistry laboratory. If the experiment requires testing and storage of food or beverage samples, each sample shall be clearly marked "do not eat".
Centrifuge
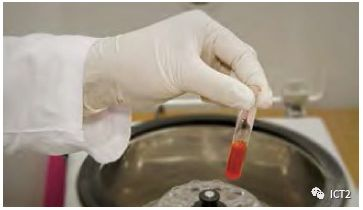
Table centrifuges should be kept away from the edge of the laboratory table so that if excessive vibration occurs, they will not "slip" off the edge of the table. Most modern centrifuges have suction feet to prevent slight vibration. Proper loading of the centrifuge prevents unbalanced rotation. The volume of liquid in the test tubes should be approximately the same, and the test tubes should be placed directly between each other or in a triangular form (see Figure). Do not pour liquid directly into the centrifuge tube sleeve. Modern centrifuges also have covers to prevent accidental contact with the rotor. Some even have a brake mechanism to prevent opening the cover. Before opening the centrifuge, be sure to close the cover and keep it closed while the centrifuge is running. Stop the rotor completely before opening the cover. Stopping the rotor by hand is dangerous and cannot be centrifuged: the sediment is separated from the solution. Follow the instructions of the laboratory instructor and ask for help if the centrifuge does not operate as expected.
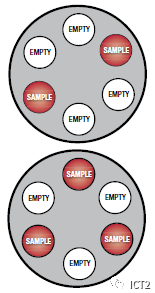
Uniform distribution of samples in centrifuge
High pressure air
Many laboratories are equipped with pressurized air valves (usually near fume hoods) for drying glassware. Use high pressure air from the "house system" only when instructed; Residual oil may come from equipment used to generate indoor air, which will pollute glassware. You should not direct pressure air to yourself or anyone else. Pressurized air can penetrate the skin without any visible openings, causing the area to expand like a balloon. Severe tissue damage may occur and hospitalization may be required.
Ultraviolet lamp
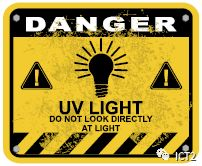
Ultraviolet (UV) lamps are used to visualize substances that fluoresce when exposed to ultraviolet light (100-400 nm). Thin layer chromatography (TLC) is used to separate the mixture; Spots can be observed under ultraviolet light. When using ultraviolet light, you must pay attention to protecting your eyes. Your eyes may be accidentally exposed to ultraviolet rays, so you should wear special glasses with ultraviolet absorbing lenses. It is best to operate the UV lamp only in a completely enclosed radiation box to minimize the exposure of others around you.
General precautions for temperature control
Many reactions require temperature control. Before assembling the equipment, please pay attention to the experimental scheme so that heating and / or cooling can be easily applied and / or removed to manage the temperature. Please carefully follow the instructor's instructions whenever an exothermic reaction occurs. Usually, chemical reactions must be initiated by heating. In the exothermic reaction, the temperature increases. The rate of heat generation increases exponentially, while the rate of heat elimination is linear. Unless proper cooling can be easily carried out, the highly exothermic reaction can quickly turn into dangerous violence, the so-called thermal runaway reaction.
Some exothermic reactions take place in the initial slow stage, followed by rapid acceleration. The initial slow phase is called induction phase. In such a reaction, if too much reagent is added initially, once the induction period ends, the reaction will become too intense to condense the vapor effectively. In case of a rapid phase of runaway reaction, external cooling must be used to control the temperature. A cooling bath must be prepared in advance so that it can be quickly applied under the reaction vessel.
Do not heat the closed system unless specifically instructed by the procedure or laboratory instructor. Consider the need to release excess pressure when the equipment is heated or an exothermic process is expected, and have an appropriate mechanism to discharge overpressure.
■ extension: dry ice and liquid nitrogen (LN2) cooling bath
When it is necessary to be lower than the temperature that can be achieved with an ice bath, dry ice or dry ice can be mixed with organic liquids. Dry ice will sublimate at - 78 ℃; The mixture of dry ice and acetone is maintained at this temperature and the acetone will not freeze. Liquid nitrogen (LN2, - 196 ° C) must be used very carefully and only under the direction of your instructor or research consultant. In addition to appropriate laboratory clothing, chemical splash goggles and insulated low-temperature gloves are required when using these very cold shower rooms. Dry ice and LN2 are also simple asphyxiators and must be handled in a well ventilated room or laboratory fume hood.
Cooling bath
When ice water is used as a cooling bath or condensation is not cold enough, salt and ice can be used. According to the number of moles of ions (considering the concept of freezing point reduction), an ice bath can be prepared in the temperature range of - 10 ° C to - 40 ° C.
Determination of melting point
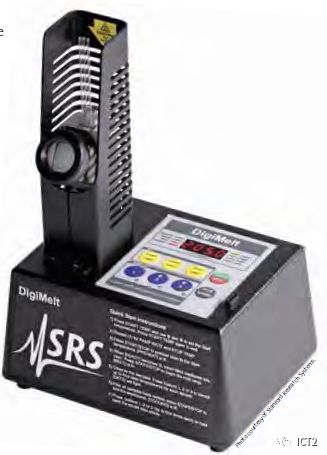
Accurate determination of the melting point of compounds is a common identification method. In the past, mercury thermometers may have been used for melting point meters because they are more accurate than alcohol thermometers. Due to the damage of mercury thermometer, most laboratories now use electrothermal melting point instrument. The main danger here is the very hot metal chamber containing the sample.
Use of Bunsen burner
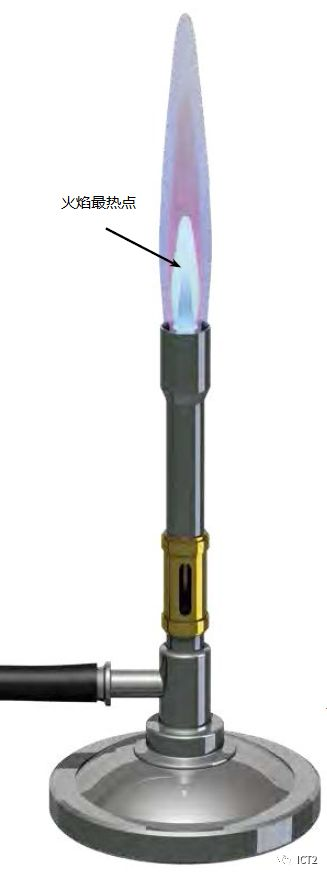
Bunsen burners can be used in the laboratory to heat samples strongly or boil water quickly. A well adjusted flame will have two different cones: the outer water cone and the inner blue cone. The temperature of the hottest part of the flame (the tip of the inner blue cone) is about 1200 ℃. Take a moment to look at the burner. You will see a bucket with a removable tip at one end and a hole at the other end. These holes regulate the amount of air entering the barrel (for the mixing chamber of fuel and air). At the bottom is a needle valve that prevents all gas from entering the barrel when it is tightened into the barrel. Before using Bunsen lamp, please check whether the hose is cracked, and ask the teacher to replace the faulty hose. Your teacher will show you how to adjust the air holes, needle valves and gas nozzles to illuminate the burner with a laboratory striker. Before using the flame, tie loose hair and remove or fasten the scarf.
Heating test tube
When the contents of the test tube are heated in an open fire, the contents are easy to overheat, resulting in the contents boiling and strongly discharged from the test tube. Always keep the open tube at a distance from the angle away from yourself and others. While the test tube is at an angle to the test tube support, heat gently along the side rather than at the bottom of the test tube. Another method is to heat the contents of the test tube in a hot bath.
Decompression
Water absorbers are sometimes used to reduce filtration pressure. Use only thick walled filter bottles designed for this purpose; Do not apply pressure relief to other flat bottom flasks, which may not withstand pressure relief and may break during use. The flask should be clamped on an annular support to maintain stability. Place a drain valve between the aspirator and the filter bottle so that if the water pressure drops unexpectedly and the filtrate cannot enter the tank, the water will not be sucked back into the filtrate. Whether you use a trap or not, be sure to disconnect the vacuum hose pipe on the side arm before turning off the water source. Due to the large amount of wastewater, the use of water absorbers is usually not advocated.

Summary
In this chapter, the safe use of common laboratory equipment is reviewed. Generally, laboratory processes require pressures and / or temperatures other than the environment, which may bring physical hazards to the experiment. Before starting any procedure, be sure to check the laboratory instructions, continuously evaluate your situation in the laboratory and understand the surrounding environment. You will learn to actively identify potential hazards. If you have any concerns about the safe use of the equipment and the completion of any procedures, please consult your laboratory instructor. Chapter 5 describes how to help you prevent and prepare for laboratory events.
Ference resources:
1 ACS Green Chemistry Institute. www.acs. org/content/acs/en/greenchemistry. html (accessed March 6, 2017).


